Cranberry Cheesecake!

IMG_4811

I’m not sure if it’s the pristine whiteness of a fresh, creamy cheesecake that makes it one of my favorite winter desserts, or if it’s just that it’s easier to get away with pure unadulterated decadence on the dessert front this time of year, but I’ve found myself making holiday cheesecakes like clockwork for a few years!  This year’s cheesecake was a particularly awesome specimen, in large part thanks to John’s decision to buy a 10-lb. box of cranberries this fall.  Don’t get me wrong, I love cranberries (so much so I even pickle them!), but 10 pounds is a LOT of them!  So they have been sneaking into a lot of my cooking lately!

I had a bit of a conundrum when scheming this cheesecake incarnation, because cranberries are red (yeah, not exactly breaking news), and they turn everything they touch red, too!  And I did not want a pink cheesecake–that would just look…odd…to say the least.  (Also, I’m pretty sure I’m allergic to pink!)

So just dumping a bunch of cooked-down cranberry goodness into my batter was obviously not the solution.  And throwing a bunch of uncooked cranberries wouldn’t work, either, because I wanted to make a cold-set cheesecake, and they’d be far far far too bitter that way.  So I landed on a modified marble-cheesecake technique.  I cooked my cranberries down with a teeny bit of water and spices and little sugar (just to take the edge off, I like my cranberries pretty tart!), Mixed up my cheesecake batter, and then sandwiched a layer of cranberries between layers of white cheesecake!  Worked like a charm.

IMG_4785

I also made a few modifications to the crumb crust I usually use for cheesecake, because I was feeling festive, and it seemed like a good idea!  I’m glad I did, though, because it turned out amazing!  I detest graham crackers, so I usually use gingersnaps for cheesecake crust, but I didn’t want the gingersnap flavor to overwhelm the cranberries, so I used shortbread cookies and a pinch of rosemary, which gave the cheesecake a lovely piney/wintery flavor, but it was super subtle.  And rosemary goes with cranberries amazingly well!

The whole thing turned out so well, I just had to share (and, I admit, record what I did so I can do it again some time!).  So without further ado, here is my rendition of Cranberry Cheesecake with Rosemary Shortbread Crust.

Cranberry Cheesecake with Rosemary Shortbread Crust

For the crust:

  • 8 oz. shortbread cookies, crushed to fine crumbs
  • 8 T. salted butter, melted
  • 1 tsp. powdered rosemary

For the cheesecake:

  • 2 c. raw whole cranberries
  • 1 T. water
  • 1 T. sugar (or to taste)
  • 1/8 tsp. ground cloves
  • 1 lemon
  • 1 c. granulated sugar
  • 1/2 cup water
  • 1 T. honey
  • 1 packet knox unflavored gelatine (about 2 tsp.)
  • 3 8-oz. pkg. cream cheese, softened
  • 16 oz. sour cream*

* Use a firm sour cream–Daisy and Old Home brands work well for me.

To make the crust, combine shortcake crumbs, butter, and powdered rosemary in a bowl.  Stir till the mixture resembles wet sand, then press into the bottom of a 8-inch or larger springform pan.  Set aside to chill while you make the cheesecake.

To make the cranberries, combine cranberries through cloves in a small saucepan.  Cook over medium low heat, stirring occasionally, till all cranberries have “popped”, the mixture has thickened, and cooked down almost to a loose jam.  Remove from heat to cool while you mix up the cheesecake batter.

To make the cheesecake batter, peel the lemon with a vegetable peeler (so you get large strips), then juice the lemon.  Put peel and juice in a 2-qt. saucepan, along with the water and honey.  Cook over medium heat, stirring often, till sugar is completely dissolved.  Let mixture cool to less than 130 degrees F (THIS IS REALLY IMPORTANT…if the mixture is too hot, the gelatine won’t work and you’ll have cheesecake pudding).

Once the lemon syrup has cooled sufficiently, fish out the pieces of lemon peel and discard.  Sprinkle the surface of the syrup with the gelatine and let is sit a few minutes to soften up.  Stir it in with a whisk and let is sit another minute to make sure it’s all moistened.

While gelatine is activating, combine cream cheese and sour cream in your stand mixer.  Whip (using the whisk attachment) until smooth and combined.  Pour in the lemon syrup/gelatine mixture and whip till completely mixed.

Pour about half your cheesecake batter into your prepared crust, smoothing the surface so it’s mostly level.  Dollop your cranberry mixture around and swirl it a bit with a table knife (this will break up the clumps of cranberry so you have nicely marbled but hidden cranberries!).  Once you’ve swirled to your satisfaction, spread remaining cheesecake mixture over the cranberries and smooth.  Garnish with rosemary sprig and cranberries, if you like!

Set the completed cheesecake to chill for at least overnight–24 hours is ideal!  To serve, run a hot knife around the outside edge of the cheesecake and then unmold from the springform sides.

Keep leftovers chilled…this is a cold-set cheesecake, so it gets a bit wibbly if you let it warm up too much!

Makes 16 servings.

Pannukakku (Finnish Pancakes)

Pannukakku (say it with me: bun-oo-guck-oo) is something I was introduced to when I married into my husbands very Finnish family. They are something, I think, of an acquired taste (at least for me) and I am never quite sure if I like it until I have that first bite. In fact, the first time I had it, I was rather grossed out…you see, pannukakku is a thin, custardy oven pancake comprised of flour, eggs, milk, sugar, salt, and butter. Traditionally, recipes seem to call for a very very small amount of flour, resulting in a very thin, super egg-flavored, floppy thing.

Which is so not my thing, even with the liberal application of jam and/or syrup!

I like my custard thick and firm, my pancakes light and fluffy. Pannukakku is sort of like the bastard stepchild of fallen souffle and pancakes. I’m not a huge fan of fallen souffle, and I LOOOOOVE pancakes, so I’m always like: “why can’t you be more like your father?” and the panukakku is all like “pancakes isn’t my real father”. And then my hubby breaks out the star wars references, “Pannukakku, I am your father…search your feelings yadda yadda yadda,” and breakfast goes downhill. But seriously, whenever we have pannukakku with my hubby’s family, I always find myself wishing it were just a bit different…more solid, less…something…maybe less eggy?

The thing is, I love all the constituent ingredients in pannukakku. I mean, how do you go wrong with the basic building blocks of baking? You can’t! Yet somehow, pannukakku just rubs me the wrong way, so I decided to figure it out. Well, really, I was standing in the grocery store in front of a giant eggnog display, thinking about making brinner (aw yeah, breakfast for dinner), and all of a sudden I went from pancakes to eggnog pancakes to eggnog pannukakku!!! I nabbed a bottle of ‘nog and trotted back to my kitchen with visions of sugarplums pancake batter dancing through my head!

20111228-213044.jpg

To address the issues I have with the consistency, I added a bit more flour than the amount called for in the recipe my hubby’s family uses, and I have to say, I really enjoyed this batch! I made a quarter recipe (this doesn’t exactly reheat well) and it fit my little 8″ long oval baking dish perfectly.

20111228-213029.jpg

The pancake is really easy to make, just whip everything into a batter and bake for a really really really long time. Seriously, your kitchen will smell awesome looooong before the pancake is set, but it’s worth the wait, because eventually this will come out of your oven!

20111228-213057.jpg

And then it will fall a bit. But that’s OK, it won’t last long enough to worry about it!

20111228-213118.jpg

And so I give you…

Eggnog Pannukakku (serves 4-6)

  • 4 c. eggnog
  • 4 eggs, well beaten
  • 1-1/2 c. flour
  • 4 T. sugar (optional)
  • 1 tsp. salt
  • 2 T. butter
  1. Place butter in a 9×13″ baking pan (or two if you like thinner pancakes). Place pan in oven while preheating to 350 F.
  2. Combine eggnog, eggs, sugar, and salt in large mixing bowl. Whisk in flour a little bit at a time, making sure there are no lumps.
  3. Remove pan(s) from oven and swirl with butter to coat bottom and partway up the sides. (Be careful–pans will be HOT!)
  4. Gently pour batter into pan(s). Bake pancake at 350 F for 40-50 minutes, till pancake is puffed and golden at the edges, with golden spots beginning to appear on the surface. Let cool a few minutes before serving.
  5. Top with syrup or jam of your choice!  Nyom!

20111228-213127.jpg

Weeknight Salted Caramel Sandwich Cookies

via polyvore

I was dashing through my local Whole Paycheck Market the other day to pick up a dozen eggs and some spinach (I hate that they’re the closest market, because I’m always tempted to swing by when I come up short on ingredients, thinking that this time I’ll be able to get out the door for under $10. Which never happens. But I digress). In the checkout lines, they had set out salted caramel samples. I’m a sucker for caramel, have been ever since I worked at a candy store in high school and got hooked on real, honest-to-goodness-cream-and-sugar-and-butter-and-nothing-else caramels. Knowing that if I loved it, I’d buy the whole pound bag next to the sample dish (and knowing that my wallet would scream bloody murder if I did that), I pocketed my sample, checked out and headed home, gold-plated spinach and eggs in hand.

I sort of forgot about the caramel in my coat pocket for a couple days, and then squealed with delight when I found it on my way in to work Monday morning. I had meetings all morning, and I can’t lie: the mere thought of that caramel kept me going through them (OK, that and my usual cup o’ coffee, if we’re giving credit where credit is due). So when I got back from my last meeting for the day, I pulled the (now somewhat careworn and well traveled) caramel out and took a little bite. It was awful, folks. It was totally the wrong texture, rather gritty and waxy, and the only thing you could taste was salt. No cream, no smoky caramelized sugar notes. Just salt and bitter disappointment. The thing practically crackled with salty electricity. I spit it out. Yup, I, who love caramels more than fluffy bunnies and unicorns and rainbows combined, I spit out that caramel. I was so mad! I’d had my taste buds set for caramel, not a salt lick! (And coming as it had from Whole Paycheck, I sort of had pretty high expectations, you know?)

I stewed about it over lunch. All I could think about as I ate my curried carrot soup was: how could they DO this? How DARE they do this?! Just who did that caramel company think they were, anyhow?!?!?!!??!?!?!?!?! HULK SMASH. Oh, I digress again.

As the afternoon wore on, I decided I could do better myself. I know how to make caramel (yes, it’s a bit of a pain, and mildly dangerous, but not too bad if you’re not pressed for time and pay attention to what you’re doing the whole time). So I hunted down my caramel recipe and then I started thinking about how I still had to go to the grocery store to get all this stuff to make it (yes, I’m somehow out of cream and sugar all at once…this happens) and how I was probably going to be pretty low energy by the time I got off work, and I decided I’d make cookies, too! And stuff them with caramel! And that would show the caramel company that shall not be named (and who, I am sure, are blissfully unaware of this whole drama-scape)! Well, actually, I decided that making individual caramels sounded like an awful lot of work, but that cookies were pretty easy, and I could make buttery sandwich cookies and stuff them with a stiff caramel sauce and still be deliriously happy with the caramely results.

So I swung by my co-op on my way home to snag caramel fixings and set to work. Because the cookie dough needs to rest in the fridge for a while, I started on those first.

Butter Cookies

  • 140 g butter
  • 125 g granulated sugar
  • 1 large egg at room temperature
  • 280 g all-purpose flour

Put the butter in the bowl of your food processor and process (scraping down the bowl as needed) until butter is smooth and fluffy.  Fluffy is key, folks.

20111111-121235.jpg

Add the sugar and continue to process till thoroughly creamed together.

20111111-121256.jpg

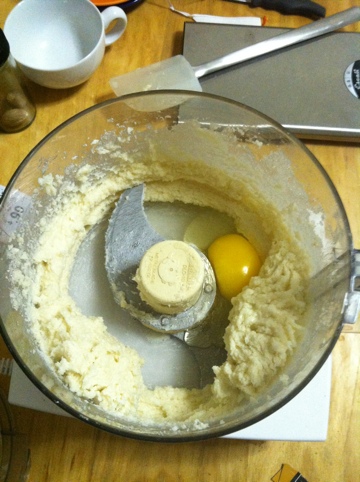
Add the egg and continue to process till mixture is satiny smooth (scraping down as needed all the while).

20111111-121305.jpg

Add flour all at once and pulse 10-12 times, till dough forms streusel-like clumps.

20111111-121314.jpg

Turn dough out onto lightly floured board and gather into a ball.  Divide dough in half and flatten each half into a disc. Wrap each disc in plastic wrap and chill till firm (usually 3-4 hours, but if you’re rushed, you can use it sooner…the firmer the dough is, the less sticky it is to work with, though).

20111111-121325.jpg

Line baking sheets with parchment paper and preheat your oven to 350F.

Working with only one disc at a time (leave the other in the fridge to contemplate its fate), roll dough out on lightly floured board till it is about 1/4″ thick. Cut cookies out using a round cutter that is 1-1/2″ in diameter. Place cookies on lined baking sheets, leaving about 1″ between each.

Bake cookies for 8-10 minutes, until they are set but pale, and just golden on the bottom. (Thinner or unevenly thick cookies will take on more color, that’s fine!).

Cool cookies on wire racks. Cookies will keep about a week.

Gather scraps into a new disc and chill before reusing.  Repeat till all dough has been used.  Unused dough can be refrigerated for about a week, or frozen for up to a month.

Once I had my cookie dough chilling, I made dinner. But that’s neither here nor there, really. I had some leftover turkey that needed using, and I was getting hungry, that’s all. But once I’d had my tasty dinner, I was fortified with enough energy to make the caramel sauce!!

Salted Caramel Sauce

  • 120 g sugar
  • 60 g unsalted butter
  • 100 mL cream
  • few drops vanilla extract (optional)
  • 1/4 tsp. salt (only add if using unsalted butter)

Melt sugar over medium heat, stirring constantly.  At first, it will look like nothing is happening, then it will start to get crumbly, and then you will see molten sugar pooling at the edges, like this:

Cook sugar until it turns amber and sugar is completely dissolved, like this:

Meanwhile, heat cream in a small saucepan (or microwave if you’ve got one laying around). Once sugar turns amber, add cream to sugar mixture (watch for sputtering and splattering…this is the dangerous bit). Stir to mix well.

Add butter (and vanilla and salt, if using) to sugar mixture. Stir to mix well, then remove from heat and let cool.  Isn’t caramel pretty!?

Once sauce has set up a bit, use to fill cookies (or over ice cream or whatever you’d like). Keeps well in the fridge for up to a month.

Caramel is pretty easy to make, and these proportions make more of a sauce than a candy that will set up (just adjust the milk to sugar ratio for different consistencies). You just want to be really careful when dealing with hot molten sugar, as it creates very very very bad burns should it touch your poor skin. If disaster is averted, though, you should end up with something that looks a lot like this:

Once I had the caramel sauce cooling, it was time to bake cookies! Yay! I rolled my dough out and cut out my rounds.

If the dough is too hard to work with, put it in the fridge for another 30 minutes and try again. Once they took a pass through the oven, the cookies were set to cool on wire racks. If you top them with caramel when they’re hot, the caramel will just run all over and off the cookie, so you have to wait a bit (I find an open window in cooler seasons does marvelous things for my impatience!)

Once the cookies have cooled, flip one cookie over, dollop a bit of caramel sauce on the center, and top with another cookie. Bottom sides should be facing the caramel for both cookies (it’s prettier), but if you are too lazy to flip cookies before dolloping, very few people will hold it against you once you ply them with a salted caramel sandwich cookie!

If your caramel sauce has set up too much to easily dollop, gently reheat it a little, stirring constantly, till it reaches a more compliant consistency.  You’ll  be able to tell if it’s set up too much because it will look like brains when you stir it:

Once you have the cookies cooled a bit and the sauce the proper consistency, filling the cookies is a snap!

And, if you’re lucky, you’ll have leftover caramel sauce!

OK, to be honest, most people will not consider these a weeknight endeavor (I have a good bit of ambition when it comes to cooking, especially if I tell myself it’s OK to leave the kitchen looking like a bomb went off overnight, which, I have to admit, happens a lot).  But!  You could very easily make the dough one night, the caramel another, and then bake and assemble the cookies on a third night (or perhaps on a rainy/snowy Saturday afternoon).  Please Please Please don’t let the fact that this recipe takes a bit of time dissuade you from making your very own caramel-stuffed blobs of awesome!